Build your own wagon chassisFour-wheel
chassis Mk I - initial attempts
Chassis choice
 Note on this example, how the axleboxes are hung under, rather than on the side of the solebar. 
But there's two things wrong here for the NZR "look". 1. The channel-section solebar is inside-out for our later 10ft and 13ft wheelbase chassis, and most importantly. . . 2. NZR rolling stock is noticeably quite low-slung compared to British, European, or American counterparts, probably because of smaller wheels. For four-wheelers the W irons with axleboxes are mounted on the sides of solebars rather than slung underneath. Bogie bolster mountings seem to be a lot shorter too. So generally it appears the wheels end up just clear of the underside of the wagon floor. See drawings and photos for examples.
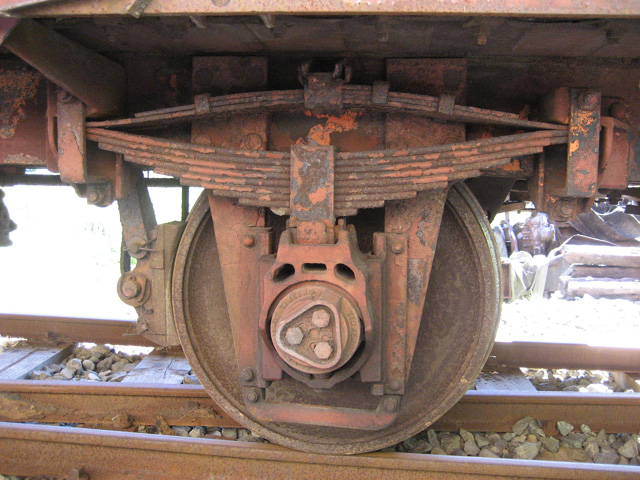 is tucked right up on the side of the solebar rather than hanging out in the breeze! Kp3231 - Silver Stream Railway.
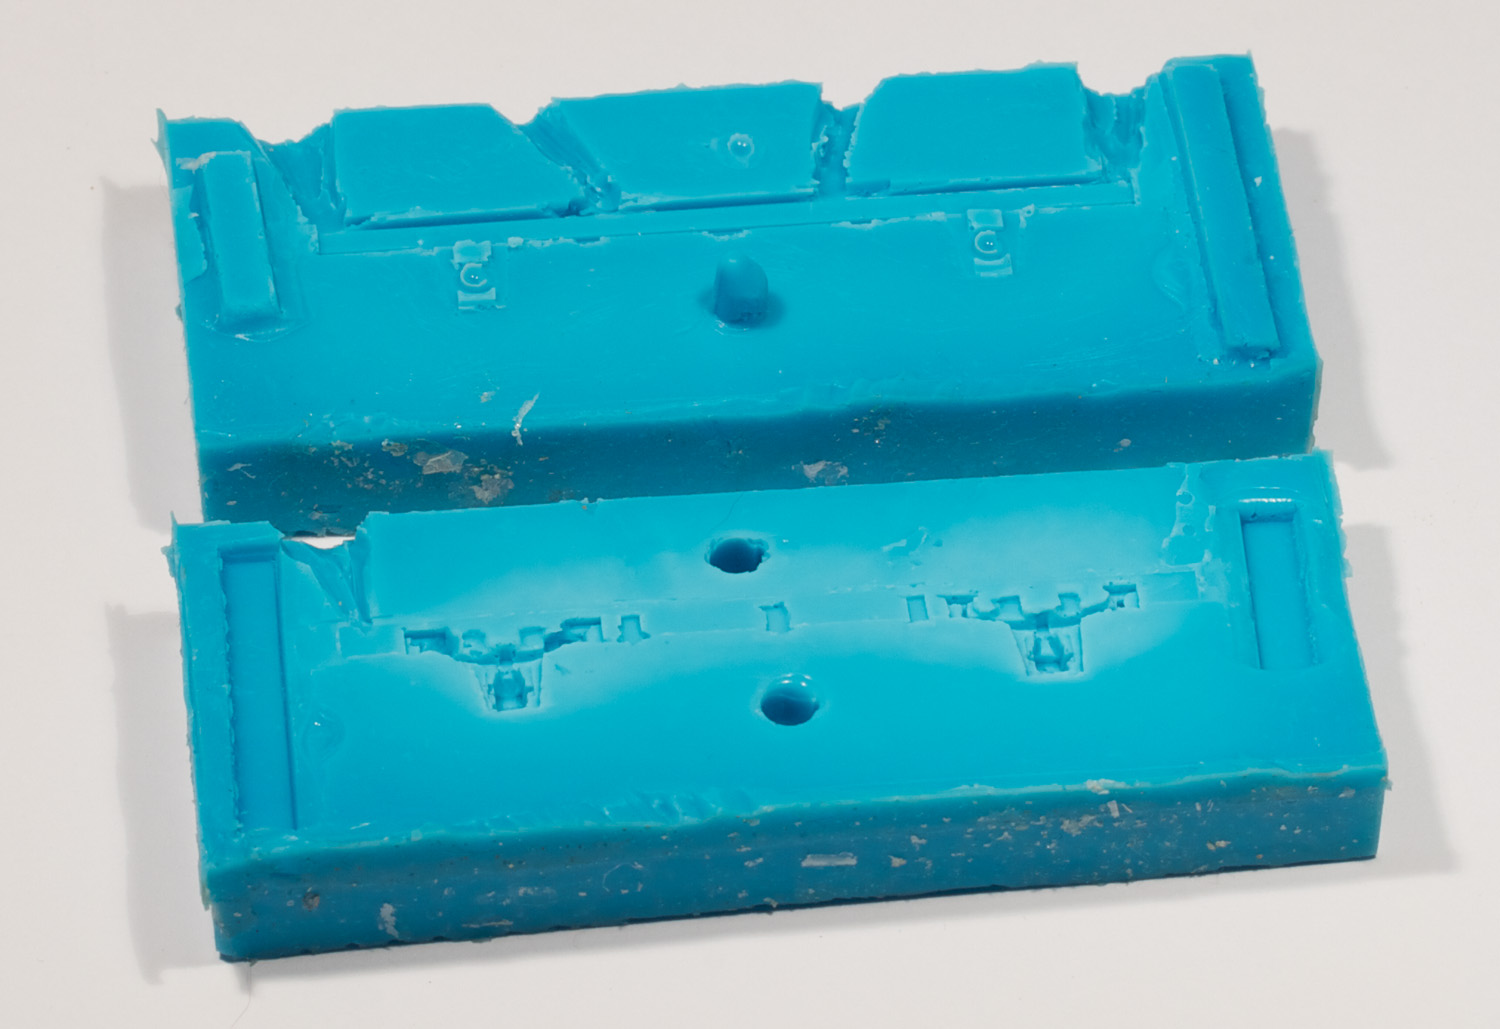
But then that is up to you. Maybe just plonk the body on top of a trimmed up Ratio or other brand chassis. Initially I wanted the ability to churn out heaps of chassis, so as a trial made up a 10ft chassis "kitset" of masters and then moulds, with the idea of later applying lessons learnt to producing 13ft chassis as well. These first attempts were used on my first project, a batch of La8 open wagons. The 10ft Chassis Mk I "kitset" chassis consisted of a pair of solebars with axleboxes attached, that slotted in to guides on the underside of a floor.
First attempt solebars and axleboxes

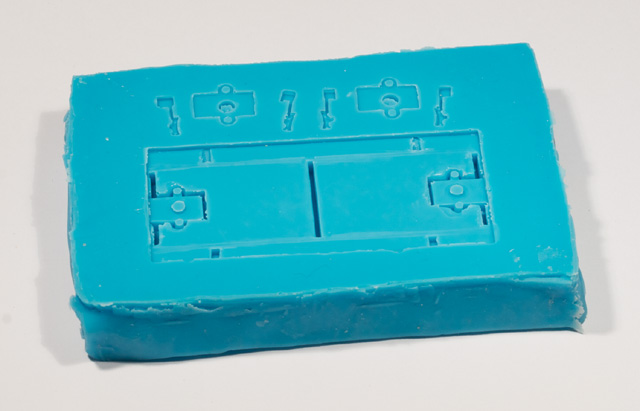
 Classic case of mould deterioration - discolouration and some detail disappearing - this is after 50 or more casts.
Chassis floor Onto the "underside" were glued half a coupler box at each end, along with back supports for the headstocks. In hindsight putting just guides for the coupler box would have been better. Then after using a couple of cast solebars (with wheels fitted) as guides and carefully positioned in place using my other pair of hands, some support pieces (guides) for positioning the solebars correctly along each side were glued on, including a centrally fitted crossmember that acts as a strengthener, and as a mount point for a brake cylinder if you feel like it. And a one-piece mould would be made from this.  Note the coupler box halves and supports for the solebars, as well as some extra details like the coupler lids, and brake shoes from a chassis kit. The latter not used in the end but maybe later?
  How about a 13ft chassis then? For the floor, it was a simple case of cutting in two and inserting a strip of sheet plastic to give the overall correct length for 21ft body like the Lc or Kp. No need to alter the coupler boxes or solebar fitting guides.
  
A variation and further thoughts The idea was to use a 10ft chassis floor casting ONLY as a jig. Fit and line up two solebar castings, and instead of glueing solebars to floor, glue a 10mm-wide cross-member, joining the solebars at halfway. The assembly is then carefully removed from the jig.
 
After accurately marking out where they will go on the target wagon floor, the solebars are then measured and trimmed to length, positioned, and with wheels fitted to confirm alignments, glued to the plain flat floor of the wagon. That is how the chassis was done for the prototype J5 sheep wagon and after successful (very very good!:-) running tests with North Yard 25mm axled wheels, this method will be used on the "production" J5 models.
Back to the solebars. . . So rather than proceed any further with the same methods, a new approach and a solebar of better design was in order. . . The 4-wheel chassis Mk II
Added detail
With the Ratio chassis as an example, the wheels supplied are far too big for the NZR look. So far I have found any of the readily available American brands' plain-back 36" HO scale wheels (10.5mm actual size) to be perfect. They turn out to be 31.5 inches in OO scale - close to our 30 inch wheels. Perfick! Those measurements are wheel diameter, excluding the flange. And the Atlas, Kadee, etc in general have 26mm length axles. North Yard supply 10.5mm wheels in plain, spoked or holed-disc styles. Unfortunately I or they can't find the really cool-looking split-spoke wheels for early NZGR wagons in this size but many were replaced by disc wheels anyway for my chosen era around the time man landed on the moon. Their ordinary spoked wheels do look very nice though, and pretty much get the "look" on the J5 sheep and will try on the Uc1 tanker wagons. From North Yard you have the option of buying 25 or 23.8mm axles, rather than the usual 26mm, and can give an ever so slightly narrower underframe on the 4-wheelers to promote the look that we are on a narrow-er gauge railway. 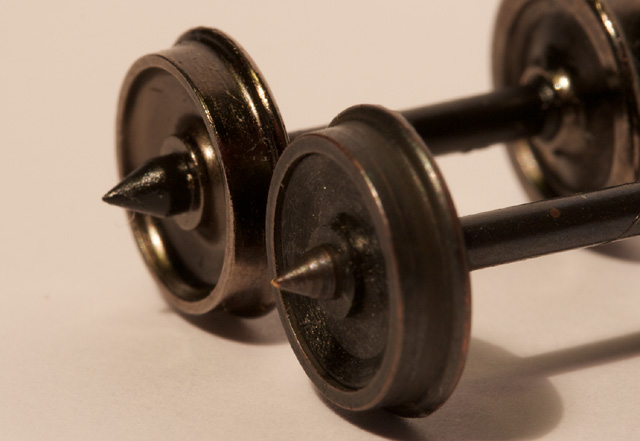 For better running 4-wheelers I drilled out the axlebox axle holes to 2mm and fitted Markits "top hat" brass bearings, available from English online stores or a similar item from North Yard here in New Zealand. Again it is up to you. It's a bit fiddly but made a big difference in smooth running.

Without a doubt, the Ozzie method to me is the way to go for quickly churning out bogie wagon chassis. I shall refer to this construction method as the "Ozzie method" in fond recognition of David Baillie and his scratchbuilding showcased on the Modelling Victorian Railways (AU) site. Lovely examples - check 'em out. And the underframe construction method is well explained and a breeze to do. Just note that the measurements given in that article - especially height - will be different for our NZR chassis. Use your scale drawings as a guide for overall measurements and bogie mount positions, but the methods are the same. Brilliant.
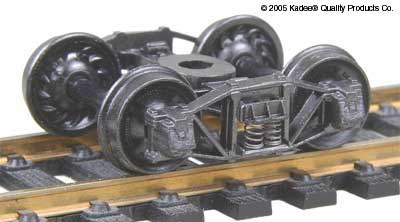
 - this on a later model Uc tanker wagon at Silverstream Railway. The bogie is tucked right up under the chassis, as it is on the earlier Uc1 and Uc4 models. Compare this. . .  (Photo from the Protocraft site) For OO scale, I found that 3mm (2 x 1.5mm) thick bogie mounts and Kadee bogies with 10.5mm (HO scale 36") wheels (see below), gave perfect height so there no is no need for coupler pads. They just go straight on the floor underside and if any adjustment is required it will only be slight. At the bogie mounts either add thin washers or file them down. Tip - Repeat tip - it is easier and produces more consistant results if you work production style if building several items the same. Cut out all the bits you need at the same time and assemble in stages completing each stage for all before going on to the next. Tip - When assembling, leave the bogie pads off and leave the chassis to dry and set for say 48 hours, sandwiched between sheets of glass with a bit of weight on top. Keeps everything perfectly flat. Add the bogie pads later.  Note the bogie mount pads, and there is no need for coupler pads. And the far end bogie bolster transoms need trimming down on the 35ft'er! 
 Need to cut back the too-long leaf springs, and it's on its way to becoming a Uc15 tanker.
Bogies For older style bogies the the best I've found so far are the Frateschi ones on their olde style goods wagons. I've bought some of their flat car kits looking to turn them into old U class bogie flat wagons. These bogies measure up 1mm longer in the wheelbase (3 inches in real life) than NZGR drawing 3181 freight bogies, hardly noticeable. BUT they have that authentic look we need.  A little high-riding at this stage. They REALLY look the part once you change the wheels to North Yard 10.5mm spoked wheels on 25mm axles.
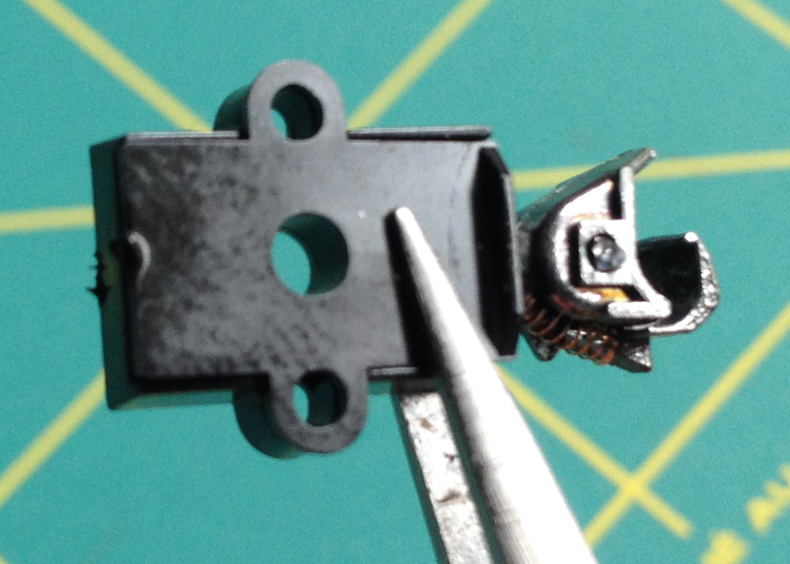
Kadee Arch-bar trucks while not truely accurate, measure up pretty well spot on to the NZR 4ft 7.5in wheel centres. Again, they can really look the part after changing the supplied 33" HO scale ribbed back wheels to 36" HO scale smooth back wheels, or use North Yard 10.5mm spoked wheels on 26mm axles.
 Note the 33" ribbed back wheels that need to be replaced. (photo courtesy of Kadee) There are plenty of modern and older style bogies available to closely match NZR prototypes but again get them with, or change the wheels to, 36" HO scale to look "right". And as with the older style, most HO scale more modern bogies measure up pretty close to the NZR 5ft wheel centres. The Frateschi and Atlas ones I have to hand are spot on at 20mm.
 (photo courtesy of Kadee)
Couplings Choice of coupling is up to you but for smooth operation follow very closely any manufacturer's recommendations for fitting and adjusting heights and distances. E.g. Kadee has an excellent height guage tool for this. More for practical reasons rather than getting the NZR look, my choice was Kadee #5 and later #148 Whisker couplers. With these couplers, all my NZR wagons so far when built off the scale plans, has the standard Kadee coupler at perfect height when the #5 box is mounted on the underside of the wagon floor - be it 4-wheeler, or bogie wagon.
 Undecided yet but they do annoy me. Kadee #148 whisker coupler assembly These are the simplest of the Kadees to put together. You'll need a coupler box and lid (I use their #5 boxes) along with the #148 whisker coupler itself. The Kadee website has a PDF of their more detailed instructions. 
Basically you fit the coupler into the box, lining up the holes. . . .

then plop on the lid, making sure the whisker wires are inside the box and not trapped with the lid. Use a tiny amount of polystyrene cement to glue the lid .
I use polystyrene cement here rather than superglue as it won't try and capilliary anwhere and everywhere and into the moving parts like superglue would - and the boxes are made of injected polystyrene anyway.
The theory There are many articles and bits written about correct weighting of wagons, including the NMRA spec. Weighting is included in this page because that is where you should have any added weight - as low down as possible to keep centre of gravity low. The NMRA spec recommends for HO and Sn3 (and supposedly OO) scales, one ounce plus half an ounce for every inch of body length. Weight for the flat wagons can be added discretely from small lead sheets that come with dentists X-Ray film folded or rolled up and cut to shape and super-glued anywhere out-of-sight on the undersides. Have a chat with your local dentist with a view to recycling BTW! Another option for weighting any wagon is lead shot either mixed in when casting resin, or Araldited/superglued in underside nooks and crannies of the chassis. Lead fishing sinkers suitably flattened and cut to shape can do as well. How heavy then? 2.5 x 0.5 = 1.25 ounces Converting to real-world measurements that's about 64 grams. My La wagons ready to roll, without load or any added weight, tipped the scales at only 12.3 grams each and therefore needed another 52 grams in weight (!) The Ub and Ud with already added X-Ray film lead sheet, weighed in at around the 40 grams mark and although running very nicely and feeling "weighty", still need to be 113 grams (!) according to formula. Some say this is a bit OTT and 40 to 60% of that is enough. In Practice After adding 52 grams of weight to the tray of an La wagon bringing it up to the recommended 64 grams, it seemed incredibly heavy, but did run very sure-footedly and smoothly through the test 'S'. For now the Las (and the J5) have each been given 14 or 15 grams of lead (as much as could be squeezed in between the solebars anyway!) to basically double their weight to 26 grams, and testing through the 'S' proved very stable and smooth - even for the two wagons I know have out-of-alignment axles. One surprise was how "light" they still feel when using the finger of god to accelerate the whole rake from a standstill. In the end might just have to go with 40% or so of NMRA recommended weight and see how we go. You could always just give your wagons a load to bring them up to weight but for me there has to be the option to run wagons empty. Maybe in my search for a cheap, reasonably accurate looking, and easy-to-produce four-wheel chassis I'll have to start looking at metal? Could replace the floor at least with a thick-ish rectangle of, say brass?
|