
La steel open wagon
The La was my fist attempt at scratchbuilding NZR wagons.
It seemed easy - just a box without a lid, a lip around the top,
and some door and end detailing.
From the drawings cut out sides and ends from plastic sheet
then add the detail parts using various sizes of flat and angle
plastic strip. The Plastruct
or Evergreen
range of plastic strips makes this job so much easier.
The trickier bits were the small domes on the ends for the
inside tie-downs. In the end these were made from thin slices
of platic rod of the right diameter, and a small semi-sphere
carved/filed from the end of a plastic rod.
Just make as many ends as you need, two per wagon. Didn't
fancy making lots of these so decided to just make a master,
then mould and cast.
If you're not in to moulding yet, just ignore those bits.
 Master end. Cutout is
for a Kadee #5 coupler box
Master end. Cutout is
for a Kadee #5 coupler box
With the angle iron running the full height, the channel strip
headstock was included, (with gap for coupler). That meant the
use of a two-part mould.
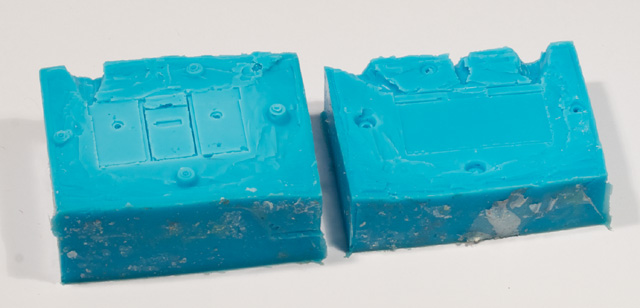 A now very worn out mould
after producing 50 or so ends - enough for 25 wagons.
A now very worn out mould
after producing 50 or so ends - enough for 25 wagons.
This is what happens once the mould starts deteriorating.
Note the discolouration, and chunks missing.
And because I wanted lots of Las, just the one master side
was made and a mould as well. Could have tried a one-piece mould
but feared the sides and ends would end up too unrealistically
thick.
 Master side from sheet
and strip plastic, and a couple of knobs, stuck to glass for
producing a mould.
Master side from sheet
and strip plastic, and a couple of knobs, stuck to glass for
producing a mould.
 And here's the La8 side
one-piece mould.
And here's the La8 side
one-piece mould.
And this too is very well worn after 30 or so casts. Time for
a new one if required.
Or if you are happy, make as many sides and ends as you need
from plastic sheet and strip to make as many bodies required.
Use your 10ft chassis of choice, but for the floors I used
my own scratchbuilt chassis castings
that include the floor, solebars and axleboxes.
So it's now just a matter test fitting and glueing the parts
together. The cast parts after a light touch up with the file
here and there fitted perfectly. This was probably due to being
extra extra super careful in measuring and cutting the masters.
It really does pay off spending extra time on the masters. A
pleasant surprise though!
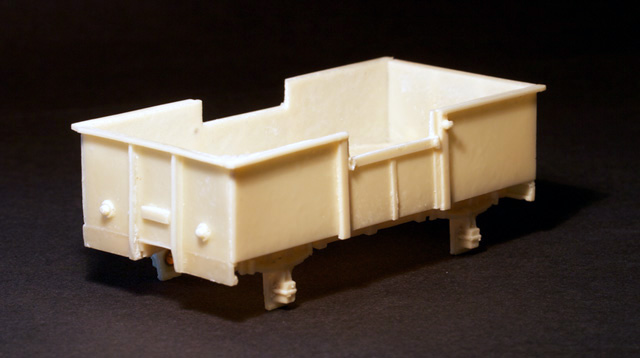
 From a second batch,
a body assembled with cast solebars attached to a cast 10ft chassis
floor,
From a second batch,
a body assembled with cast solebars attached to a cast 10ft chassis
floor,
ready for a clean up. Note the axle boxes have been fitted with
2mm top hat brass bearings
and that by now the moulds are worn so parts are not as crisp
as the first batch.
 And here's a few more
(the second batch) awaiting a cleanup - a little filling, filing,
and sanding where appropriate.
And here's a few more
(the second batch) awaiting a cleanup - a little filling, filing,
and sanding where appropriate.
The white chassis floor (top right) is from the first batch using
a different type of resin.
It's at this stage where weight should be added to the undersides
of the chassis. These wagons are very light - even once wheels
and couplings are fitted they only weigh 12.3 grams.
To bring them up to a reasonable
running weight it was neccessary to fill most of the spaces
between solebars with chopped up bits of flattened lead sinker
araldited or superglued in place.
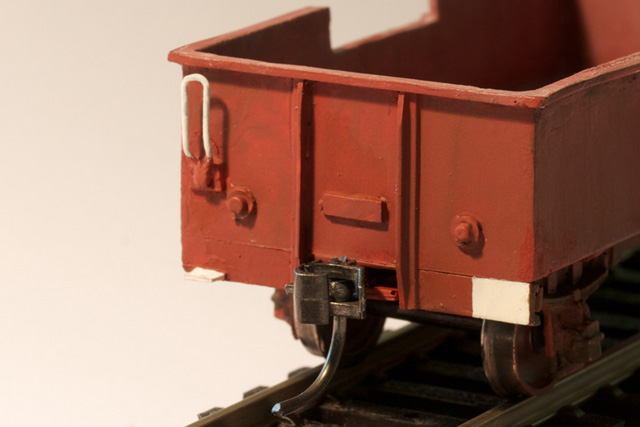 Details are added such
as handrails from wire, and shunter's step from thin plastic
strip.
Details are added such
as handrails from wire, and shunter's step from thin plastic
strip.
(From the first batch)
 And a brake lever from
strip brass bent and shaped.
And a brake lever from
strip brass bent and shaped.
Brake ratchet made from a couple of scrap plastic bits carved
and stuck together.
Must make a mould for this tiny part as every wagon will need
one!
 After some rough painting
and weathering (these wagons became quite scruffy later in their
lives),
After some rough painting
and weathering (these wagons became quite scruffy later in their
lives),
here's a pair completed just waiting for decals. Oh and brake
cylinders.
And don't look too close! I must clean these up a bit better
before painting.
(Again, from the first batch)
 The first batch awaiting
decals and brake cylinders. Very pleased mostly.
The first batch awaiting
decals and brake cylinders. Very pleased mostly.
In summary
This was my very first attempt at scratch-building NZR, and
was really pleased with :
Capturing the look of the La and its huge variety of finishes,
and being able to produce a "kit" of easily reproducable
parts to quickly churn out a rake of wagons. Cheaply too. All
of which was the aim of the exercise.
Cost is a little hard to judge but for 35 La and Lc open wagons,
it cost two sets of 500gm silicone and resin (more than normal
waste because of first attempts!), plus some micro-strip brass,
plus wheels, plus bearings, plus couplers, all worked out approximately
NZ$15 per wagon. Oh, plus a little paint and some decals.
Not so happy with :
The chassis. Accuracy and lineup of axleboxes and solebars,
including wheel clearances. Had trouble with the axlebox mould
on the bearing side that required re-drilling out the 2mm holes
for the brass bearings. So not happy with the two part mould
of the solebar. Needs a new master, but thinking about alternatives.
Also the rivet-counter is trying to come out and the axleboxes
really need the upper leaf springs for the later model chassis.
Lessons learnt here are going to be applied to the 4-wheel
chassis Mk II.
Home |


